


Staying on top of market movements is crucial for making informed trading decisions. TradingView alerts help traders monitor price changes, trends, and key levels without constantly watching the charts. By setting up customized alerts, traders can react quickly to opportunities, manage risks effectively, and streamline their workflow.
In this guide, we’ll walk through the steps to set up and manage alerts on TradingView.
This is an example only to enhance a consumer's understanding of the strategy being described above and is not to be taken as Blueberry providing personal advice.
What are alerts in trading?
Alerts in trading notify traders of market changes. They help track specific price levels, volume, or indicators. Traders set alerts for entry, exit, or stop-loss points.
Alerts can come through notifications, email, or mobile. They automate monitoring without constant observation. Alerts can either be price-based or technical, such as moving averages crossing. They also enable timely actions to minimize risk or capture opportunities.
How do alerts help in trading?
Notify users of key market movements
Alerts notify traders when significant market events occur. They track price fluctuations, volume changes, and other important shifts. This real-time information ensures traders don't miss crucial moments. Alerts are like notifications, allowing prompt responses to market changes.
Help track price levels and trends
Alerts help traders monitor specific price levels and trends. They can be set to trigger when prices reach a predetermined value. This enables traders to keep an eye on potential entry or exit points. Alerts also assist in managing trading strategies as they ensure traders stay aligned with their market analysis.
Ensure timely decisions with real-time updates
Real-time alerts provide traders with real-time updates. This helps traders stay informed about price changes and market conditions. Such timely decisions are crucial to capitalize on short-term movements. Alerts also ensure traders act quickly without being glued to the screen. They promote trading agility in fast-moving market conditions.
Minimize the risk of missing trade opportunities
Alerts minimize the risk of overlooking trade setups. Traders can set them for entry and exit points. When these levels are hit, alerts trigger action. This feature helps traders stay alert to opportunities even while focused on other tasks.
Improve efficiency in trading workflows
Alerts streamline trading workflows by automating notifications. Traders don't need to manually monitor every price movement. Alerts handle this task, notifying users when to take action. This improves overall trading efficiency, saves time, and enables more focused decision-making. They also improve trading productivity and reduce the likelihood of missed trades.
Stepwise guide to setup alerts on TradingView
1. Open the TradingView chart
The user begins by logging into their TradingView account. They navigate to the 'Chart' section from the main dashboard. This opens a new chart window for analysis. It is essential to display the desired asset when setting alerts.
Familiarity with the chart interface helps users utilize TradingView's features. This initial step is crucial for accurate alert setup. Once opened, the chart provides full access to market data.
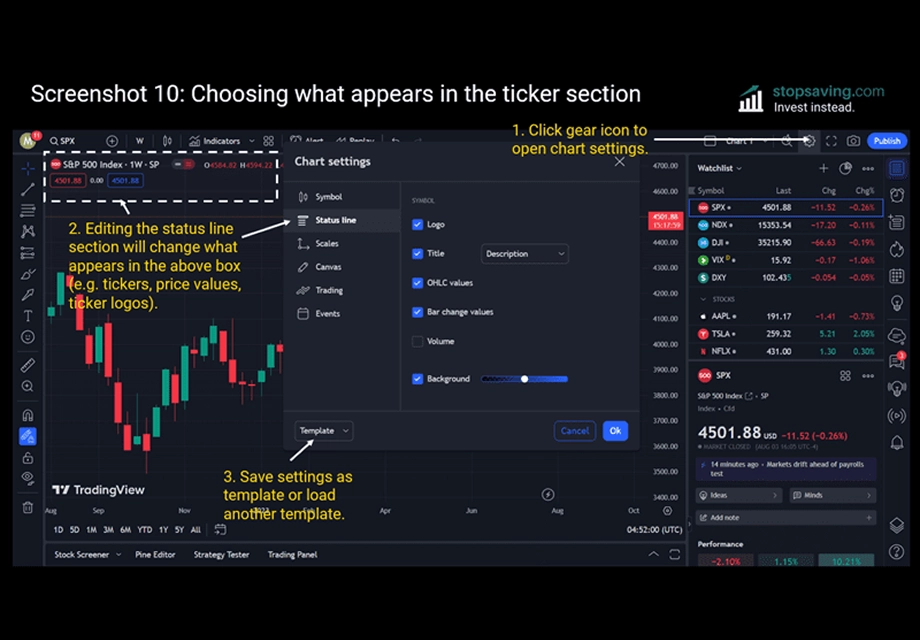
2. Click the 'Alerts' button at the top
To set alerts, the user locates the Alerts button. This is represented by an alarm clock icon at the top. Clicking on it opens the alert creation panel.
The panel provides options to define alert conditions, allowing users to personalize notifications based on their needs. To configure alerts, one must access the Alerts button. This serves as the entry point for customizing alert settings.
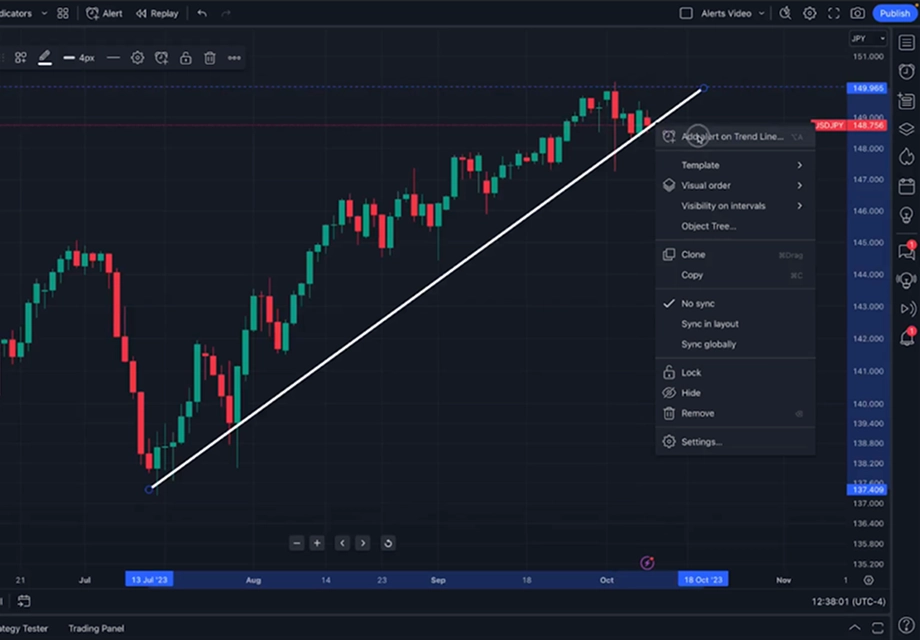
Users can also create alerts by clicking the bell icon in the top-right of the chart, right-clicking a price level or drawing, or using the keyboard shortcut Alt + A (Windows) or Option + A (Mac) for faster access.
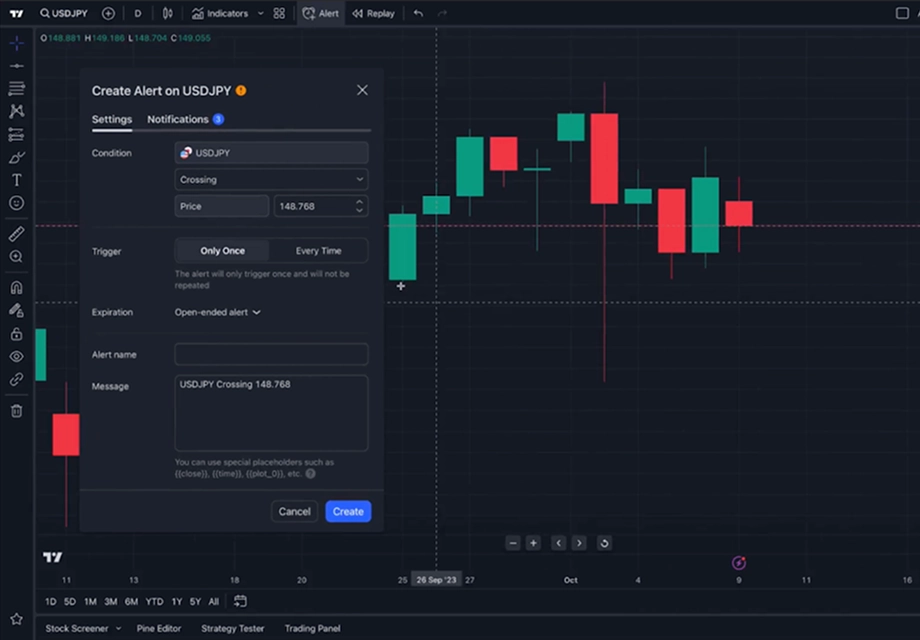
3. Select the condition for the alert
In the alert creation panel, the user chooses the alert condition, involving price levels, indicators, or custom conditions.
For example, a user may set an alert when a stock/currency pair crosses a price threshold. Selecting the right condition ensures the alert is relevant to their strategy. Customizing the alert condition allows for precise monitoring of market changes. The right choice of condition helps streamline trading decisions.
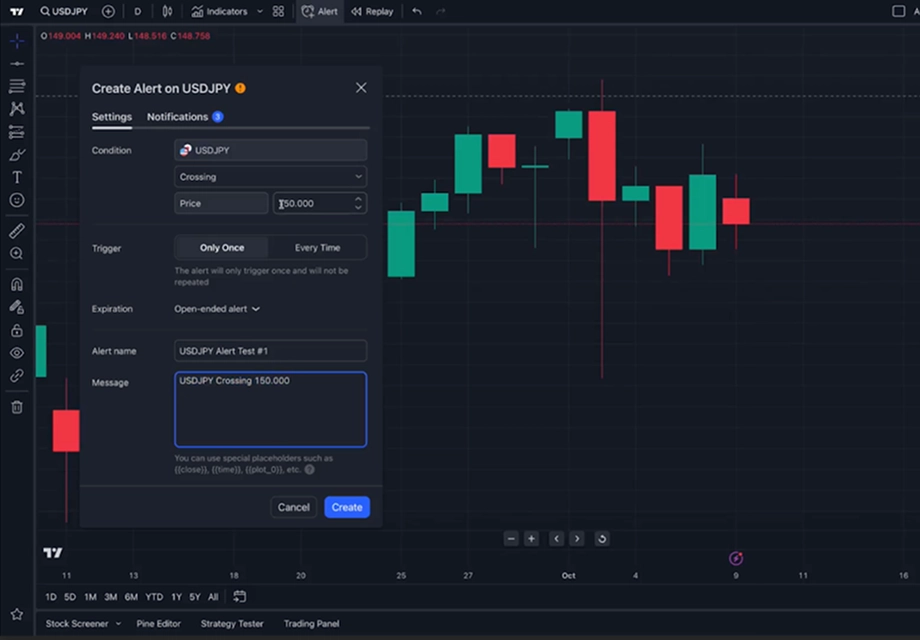
4. Adjust the alert details
After selecting the condition, the user configures alert specifics. They set the value or range for the alert's trigger.
Additionally, the user decides on the alert's frequency, such as once per bar. The expiration date and time can also be defined. Adjusting these details ensures that the alert is customized, making it easier to stay on top of trades with timely notifications.
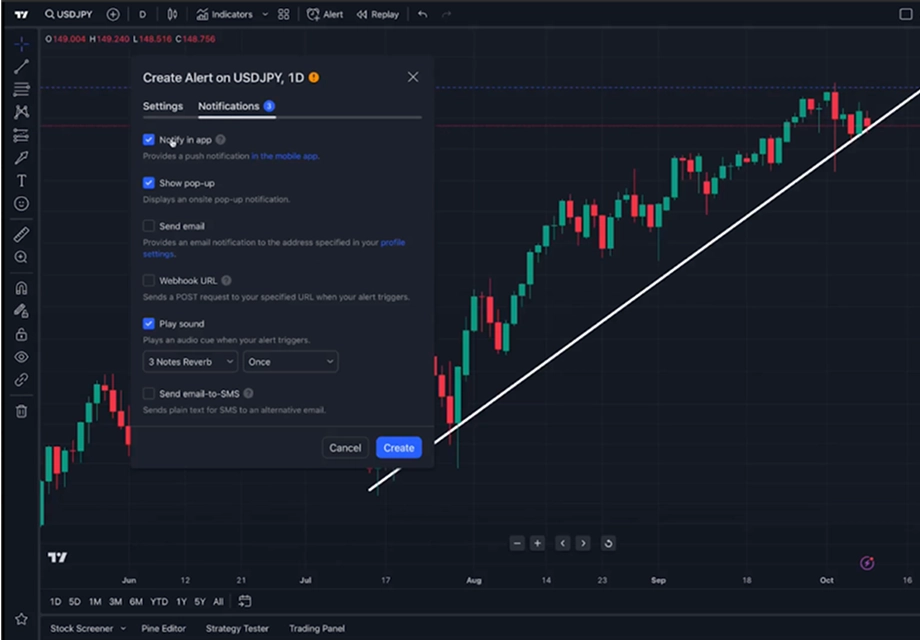
5. Choose the notification method
Next, the user selects the preferred notification method. Options include popups, emails, or app notifications. The user chooses a method that suits their trading routine.
Multiple methods can be chosen for reliability and convenience. These notifications will alert the user when conditions are met. This flexibility ensures they remain informed across different platforms.
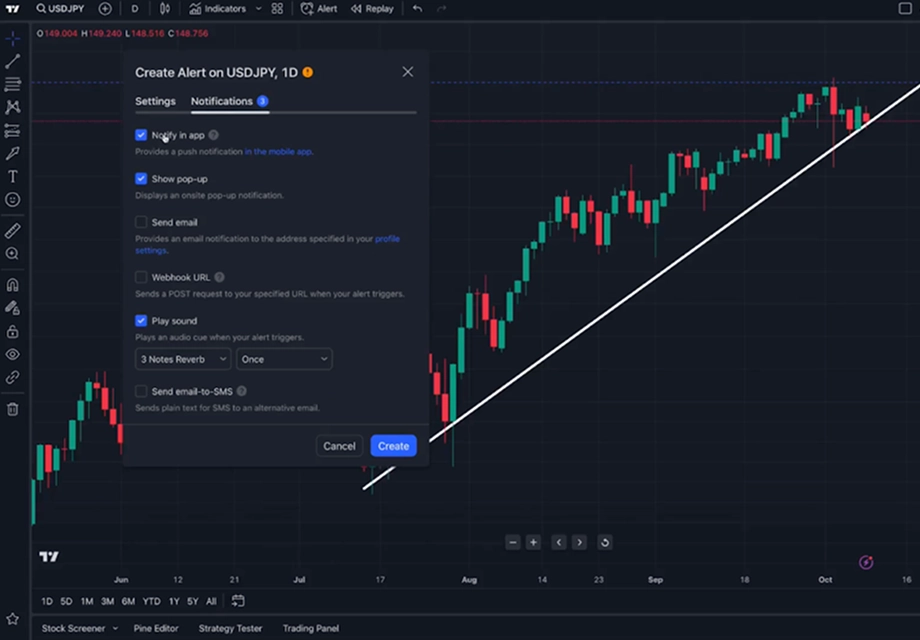
6. Click 'Create' to activate the alert
Once the alert settings are configured, the user clicks on Create. This action activates the alert and saves the settings. The alert will then be monitored for the specified conditions.
Once triggered, it notifies the user as configured. Activating the alert confirms that it's live and working. Before clicking 'Create,' users should review settings for accuracy, ensuring the alert functions as intended.
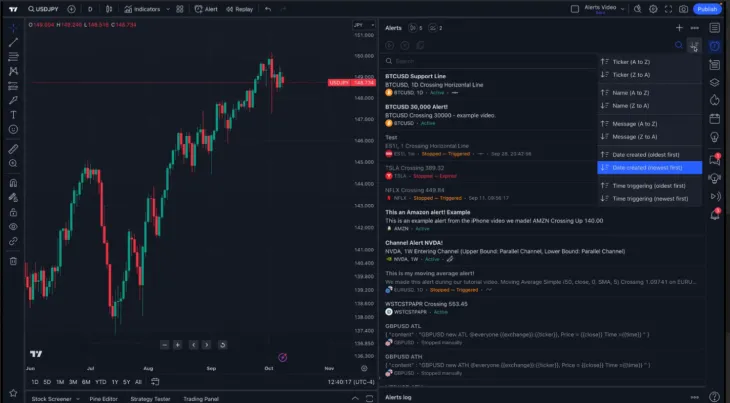
7. Managing alerts in the 'Alerts' tab
Users click the Alerts tab at the bottom to monitor active alerts. This tab displays all current alerts and their conditions. The user can view the status of each active alert.
Alerts can be managed or edited from this tab. Reviewing the 'Alerts' tab ensures the alerts remain relevant. Regularly checking the alerts tab keeps the user on track with their trading strategy.
The Alerts Manager now supports dragging alert levels on the chart, sorting alerts, and exporting logs to CSV format. These features improve the usability and auditability of alert strategies.
8. Editing or deleting alerts as needed
The user can edit or delete alerts in the Alerts tab. To edit, the user selects an alert and adjusts the settings. If necessary, they can delete alerts by clicking the trash icon.
Editing or deleting ensures that alerts remain aligned with current goals. The user can fine-tune alert conditions based on their trading needs.
Creating Watchlist Alerts (Premium and above)
TradingView now allows traders on Premium, Expert, or Ultimate plans to create Watchlist Alerts, which monitor a group of symbols and trigger when any meet the chosen condition.
Key features:
- Alerts apply automatically to symbols in a selected watchlist
- New additions/removals update alert coverage dynamically
- Alerts only trigger during regular market hours
- Limits vary by plan:
- Premium: 2 active watchlist alerts
- Expert: 10 active
- Ultimate: 15 active
How to set:
- Right-click the watchlist name.
- Choose Create Watchlist Alert.
- Define alert conditions, expiry, and notifications.
- Click Create.
Current Plan Limitations on Alerts
TradingView offers different alert capabilities based on your subscription level.
| Plan | Alert Types Available | Active Alerts |
|---|---|---|
| Basic | Price-based only | 2 |
| Pro | Price, indicator, and drawing alerts | 10 |
| Premium | All alerts, including strategies & watchlists | 400 |
As of 2025, Free (Basic) plan users can only set two active price alerts and cannot create indicator-based alerts. For full alert functionality, users must upgrade to a paid plan.
Stay notified throughout the day with alerts
Alerts boost trading efficiency by notifying traders of key market movements. They also help capture opportunities, manage risks, and automate actions like stop-losses. However, traders should avoid over-relying on alerts and ensure they're only part of a broader strategy. Regular review and alignment with market conditions are required for proper use.
FAQs
1. Do TradingView alerts trigger during pre-market or after-hours trading?
Alerts on TradingView trigger based on the chart's data feed, which may not include pre-market or after-hours prices unless enabled. To receive alerts during extended sessions, ensure your chart is set to include those hours and that your data source supports it.
2. Can I set alerts on indicators like RSI or MACD in TradingView?
Yes, TradingView allows users to set alerts on popular indicators like RSI, MACD, and moving averages—provided you're on a plan that supports indicator-based alerts. You can set conditions such as RSI crossing a certain level or MACD signal line crossover.
3. How do I stop receiving TradingView alert notifications?
To stop receiving notifications, you can either disable the alert from the Alerts Manager or delete it entirely. You can also change the delivery method, such as removing email or mobile notifications without deleting the alert.
4. What happens when an alert is triggered on TradingView?
When an alert is triggered, TradingView sends a notification via your selected method (e.g., mobile, email, popup, or webhook). You’ll also see a visual log of the alert in your Alerts tab, helping you track alert history.
5. Why is my TradingView alert not triggering?
An alert may not trigger if the condition isn’t met on the specific chart timeframe, if it’s expired, or if there’s a disconnect between the chart source and alert setting. Always verify the alert’s configuration, data source, and active status.
Disclaimer: All material published on our website is intended for informational purposes only and should not be considered personal advice or recommendation. As margin FX/CFDs are highly leveraged products, your gains and losses are magnified, and you could lose substantially more than your initial deposit. Investing in margin FX/CFDs does not give you any entitlements or rights to the underlying assets (e.g. the right to receive dividend payments). CFDs carry a high risk of investment loss.